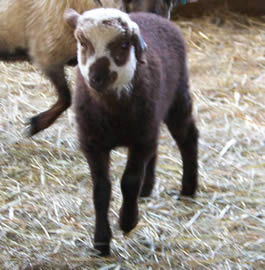
We have successfully built and used several “Hog Panel Shelters” over the years. We currently have three that are in use. Here’s a photo of one of our shelters in use by a Shetland breeding group:
A Shetland breeding group in a hog panel shelter
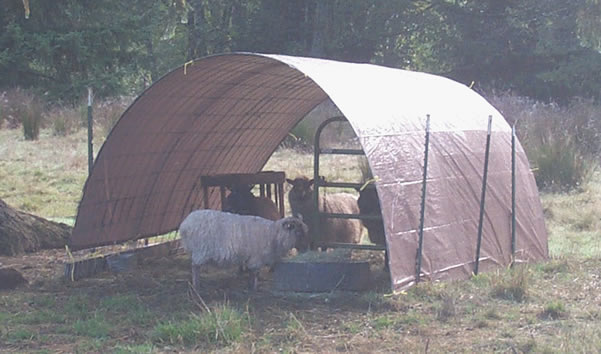
We build these shelters using what are actually called stock panels – they are 52 inches tall and 16 feet long, taller than hog panels (which are only about 36 inches tall.) Three panels are used for a shelter. The best arrangement we’ve found is to overlap the three panels about 6 inches (the spacing of the top two ‘wires’ of a panel standing up as it would normally be used.) If you look closely at the photo above you might be able to see how the two outer panels overlap the center panel.
To build a shelter like this, start by laying your 3 panels on the ground where you want the shelter with one end of the panels lined up where you want that side of the shelter. Next drive one T-post into the ground (about 2 feet deep) near the center of the end of each panel on the one side of the shelter. Put the T-post so that the bumps on the front of the post face the center of the shelter (so the panel will hook under a bump.) For example, for the shelter above, imagine that the three posts at the left side of the shelter were there and the panels were laying flat on the ground to the right of the posts. Next grab one panel at the end opposite the post and push it in toward the post while springing the center up. You might need help for this. Try to hold it on the ground at the end without the post to see where you will want that end to be. If you are building this without help, mark the spot where you want the post at the end you are holding, then move the panel aside. You should then be able to mark the other 2 post locations, move the rest of the panels aside and drive in the other three posts (the ones at the right above.) Now you can put the panels in place one at a time and fasten each end to the post as you go. Remember to overlap each panel about 6 inches. We have just used plastic hay twine to tie the panel to the post right at ground level. Wrap the twine around the T-post so it will catch on the T-post bumps and not pull up from the ground (in a windstorm.) When you have the three panels tied to the posts and in position, tie them to each other where they overlap. We tie them each in three places spaced out along the overlapping edges, again using hay twine. You might try some heavy-duty tie wraps for this instead.

Now that you have the structure put together, you might want to add a center support to keep it from bending too far left or right (looking in the opening.) We used a 4-foot wide tube gate in the one above. The picture at the right shows a better view of how the gate is attached to one side of the shelter. We just tie the top of the gate firmly to the center panel, then tie the bottom at ground level with a longer twine so that there is a space between the bottom of the gate an d the panel at the center T-post. Then we drove a stake into the ground at the other end of the gate to keep it from being pushed over. We used a 2-foot long piece of 1/2″ re-bar that I bent into a U-shape at one end, with the U hooking over the bottom tube of the gate holding it to the ground. You might need to dig little holes for the vertical gate tube ends to get the bottom tube to sit at ground level, depending on the type of gate you use. You can probably think up some other method of support instead of the gate, if you don’t have a gate handy. This support is important especially if you get snow. Last winter, the shelter above collapsed under about 8″ of snow – this was before we had added the gate support. Since then, we refurbished the shelter by taking it apart, straightening the panel and putting it back together (leaving the T-posts in place.)

The shelter shown at the right uses a 6-foot tube gate, which fits just about right between the two sides. This gate is only tied at each corner to the panels since it reaches both sides. This one didn’t have any problems with the snow last winter. You can see that this one needs to have its tarp replaced. I think that this shelter is over 2 years old, so it has weathered pretty well. Back to finishing the construction… After you have added your center bracing, you can just spread out the tarp over the panels and tie it to the panels at each grommet around the edges of the tarp. If you use 3 stock panels like I described, you can use a 12′ x 16′ tarp and it fits nicely. Start tying the tarp at one side where the panels sit on the ground. Be sure to pull the tarp tight and tie it so that the twines hold it tight. Then just work your way around tying at each grommet. We just used the cheap tarps, which cost less than $10. If you want it to last longer, you could use a heavy-duty tarp. Since the sheep tend to rub on the sides, they might still wear out the heavy tarp, so it might be cheaper in the long run just to replace the tarp every year or 2 with another cheap one.
Below are a few more pictures of these two of our hog panel shelters. The shelter in the bottom two pictures was built without overlapping the panels, so the tarp wasn’t as wide as the shelter. You can also see that it is due for a tarp replacement…

We hope that you find this information useful. Good luck building your own Hog Panel Shelter!
28,411 views